As you get further into your Kubernetes journey, learning about various configurations of your Kubernetes cluster, you will want to create a high-availability Kubernetes control plane configuration for your Kubernetes cluster. After all, you don’t want to rely on a single node for API and control plane access to your Kubernetes cluster. Instead, running multiple nodes with the control plane HA configured is best. It ensures you can reach your Kubernetes services. Kube-VIP is an excellent free and open-source solution for creating a global service loadbalancer address for accessing your control plane. Let’s look at the Kube-VIP configuration and find out how to configure this in K3s.
Watch a walkthrough of setting up a new K3s cluster with a Kube-VIP virtual IP:
What is K3s
K3s is a popular Kubernetes distribution that is lightweight and easy
to spin up a production-ready Kubernetes cluster. It is a minimalized
Kubernetes executable from Rancher that allows easily spinning up
Kubernetes clusters using tools like K3sup.
What is Kube-VIP?
Kubernetes does not have native load balancer capabilities. Instead, it relies on glue code that integrates with cloud service loadbalancer address exposure to create a virtual IP address for accessing your HA solution.
Kube-VIP is a free and open-source solution that allows spinning up an additional IP address to take care of load balancing for control plan HA. If you have vendor API integrations, you want to ensure the API is always available to keep services up and running. In addition, it provides a service load balancer that allows load balancing for your services running in the Kubernetes cluster.
You can learn more about Kube-VIP from the official documentation here:
Service Load Balancer
It handles routing traffic between the nodes in your Kubernetes cluster and ensures your services are provided IP addresses for configurations of the Kubernetes service type of type LoadBalancer network configuration. It provides the same functionality and key features as cloud service provider solutions that provide control plane HA via the glue code.
With Kube-VIP it is possible to provide Kube-VIP with a virtual IP address from the existing network DHCP.
Static pods
Static Pods are Kubernetes Pods that are run by the kubelet in Kubernetes, but only on a single node and are not managed in the normal way, by the Kubernetes cluster itself. Static Pods can’t take advantage of ConfigMap or Kubernetes tokens. To create an easier experience of consuming functionality within Kube-VIP, the Kube-VIP container itself can be used to generate a static Pod manifest.
Manifest generation
As mentioned, the Kube-VIP container itself can be used to generate static Pod manifests. To do this, you run the Kube-VIP image as a container and pass the needed flags for the capabilities you want to set to enabled and exposed.
Kube-VIP operates in two distinct modes:
- ARP – With ARP mode, this is a layer 2 protocol used to inform the network of the location of a new IP address. Kube-VIP uses ARP mode when configured to inform the network of which physical device has the link with the logical IP address.
- BGP – BGP is the routing protocol of the Internet. So, it is well-proven. With BGP, networks that rely on routing can ensure the new addresses are advertised to the routing infrastructure.
Kube-VIP configuration for K3s control plane HA
Let’s look at the Kube-VIP configuration for K3s control plane HA. In my example below, I will be using the first control node I spun up using the K3sup utility to install Kube-VIP. Again, read my in-depth blog post here on how to create a K3s cluster using K3sup quickly. After you have your first K3s control node create, only a few steps are needed to install and configure Kube-VIP. After you install Kube-VIP, you can then join up your additional nodes using the virtual IP.
Kube-VIP RBAC script
The first thing we want to do is apply the RBAC script for Kube-VIP. On your K3s cluster, run the following:
kubectl apply -f https://kube-vip.io/manifests/rbac.yaml
Pull the latest Kube-VIP cluster image
Next, we need to pull the latest Kube-VIP cluster image. To do that, we need to run the following command:
ctr image pull docker.io/plndr/kube-vip:latest
Create an alias
The next step involves creating an alias for the Kube-VIP command:
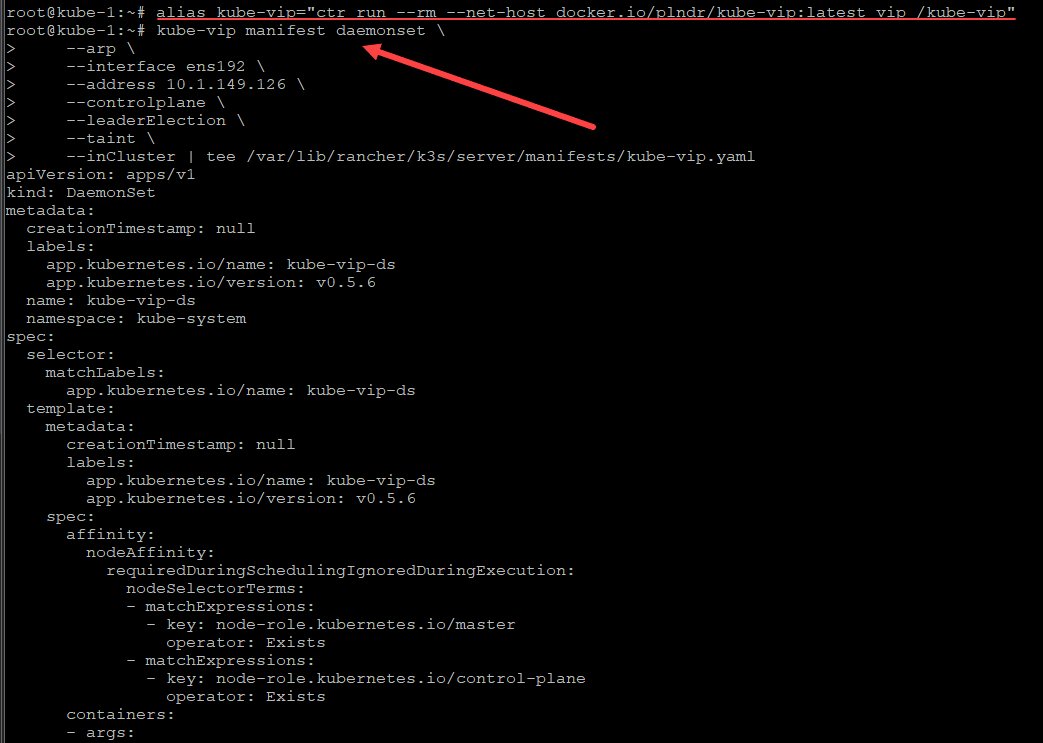
alias kube-vip=”ctr run –rm –net-host docker.io/plndr/kube-vip:latest vip /kube-vip”
Create the Kube-VIP manifest
Next, we create the Kube-VIP manifest daemonset. The address parameter below is address we added to the –tls-san parameter when creating the K3s cluster using K3sup.
kube-vip manifest daemonset
–arp
–interface ens192
–address 10.1.149.126
–controlplane
–leaderElection
–taint
–inCluster | tee /var/lib/rancher/k3s/server/manifests/kube-vip.yaml
Check and see if the virtual IP address is working
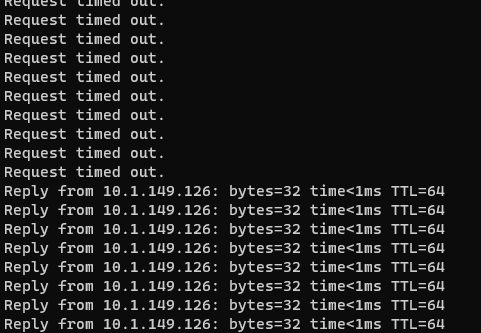
After you deploy the daemon set, after a few seconds, you should start to see the virtual IP address of the Kube-VIP configuration start to ping.
You can check the daemonsets and we should see the kube-vip-ds listed with the desired and ready populated
Joining the other K3s nodes using the virtual IP address
After we have the Kube-VIP virtual IP address pinging, we are good to use this IP address for our additional K3s nodes. We are using the Kube-VIP virtual IP in the “–server-ip” parameter below.
k3sup join
–ip 10.1.149.124
–user root
–sudo
–k3s-channel stable
–server
–server-ip 10.1.149.126
–server-user root
–sudo
–k3s-extra-args “disable servicelb –flannel-iface=ens192 –node-ip=10.1.149.124”
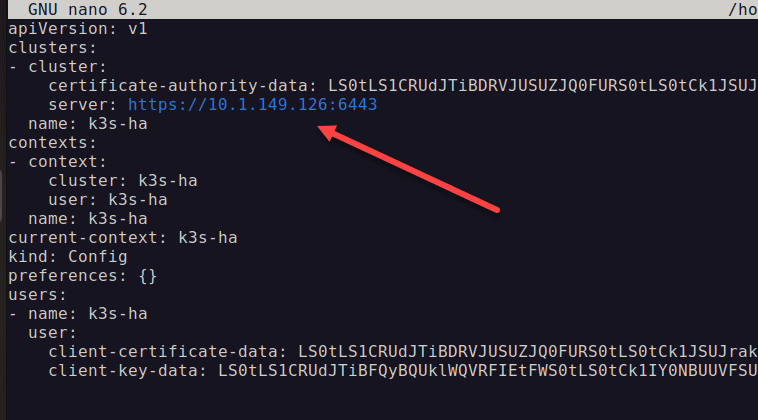
Change your kubeconfig to the virtual IP address of Kube-VIP
You should be able to configure your kubeconfig for the virtual IP address provisioned using Kube-VIP.
Testing Kubernetes control plane failover
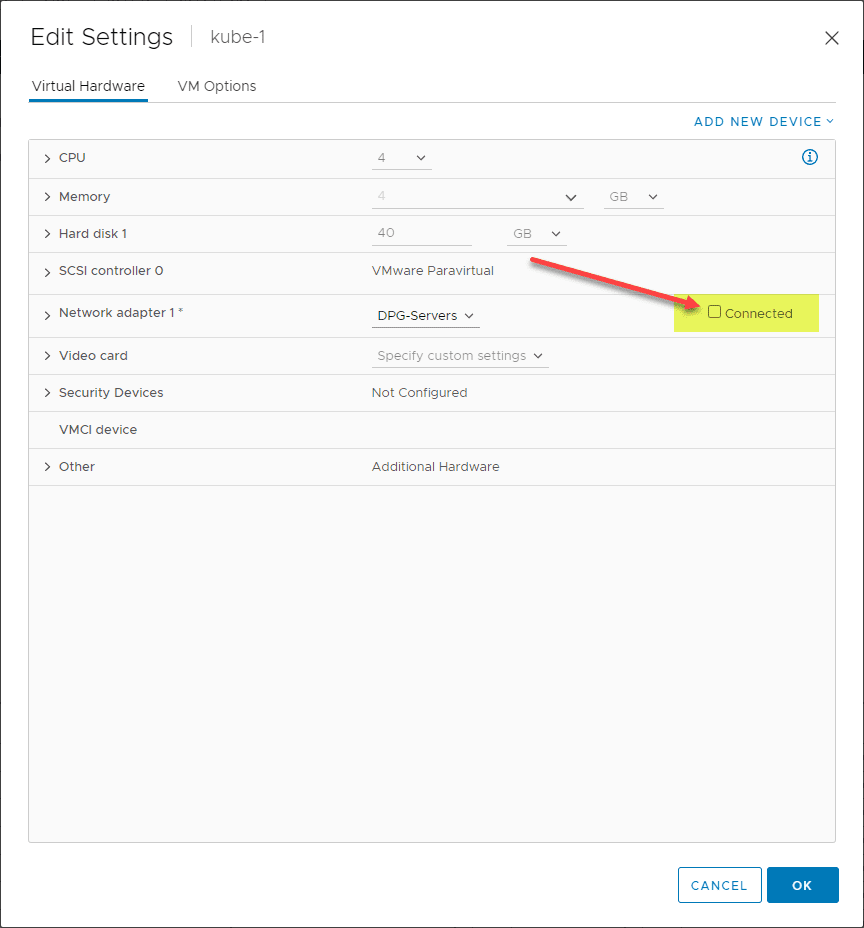
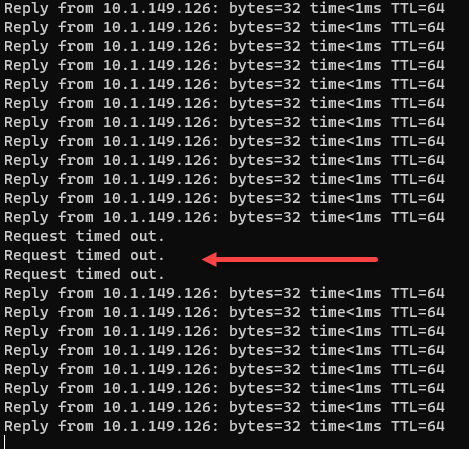
Now that we have Kube-VIP configured let’s perform a real-world test to see if the API endpoint fails over as expected. I disconnect the virtual network adapter on my VMware virtual machine K3s host to simulate a failure.
As you can see, we lost just three pings, before the virtual IP address of Kube-VIP failed over and started pinging once again. Awesome!
Wrapping Up
Using Kube-VIP to create a control plane HA was straightforward and intuitive. The solution worked exactly as expected, and I had no issues getting the VIP up and running on my K3s cluster created using K3sup. After I disconnected the control plane node housing the virtual IP address, the failover test worked as expected. It quickly failed over to another node.



0 Comments